Bunny Butter Cookie
Click to Skip to the Bunny Butter Cookie Recipe Baking a little slice of calm in a very chaotic world—and that’s exactly what inspired today’s recipe: Bunny Butter Cookies.
Continue Reading Click to Skip to the Bunny Butter Cookie Recipe Baking a little slice of calm in a very chaotic world—and that’s exactly what inspired today’s recipe: Bunny Butter Cookies.
Continue Reading
This Peach Almond Dacquoise Cake makes the perfect gluten free afternoon tea dessert!
Continue Reading
Looking for that perfect 🦃Thanksgiving party dessert that is both impressive and easy to make? This pumpkin creme brulee recipe will transform your Fall parties forever!
Continue Reading
This easy recipe creates an impressive Earl Grey Panna Cotta complimented by a delicious Blueberry Compote! Make ahead to impress your date or for a house party!
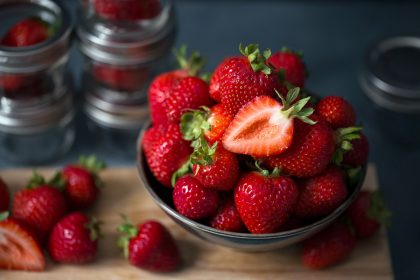
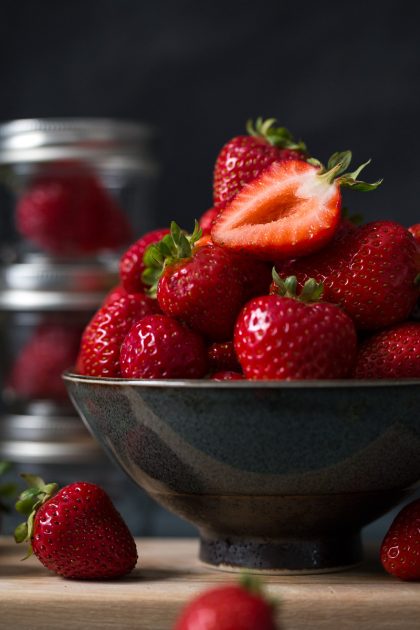
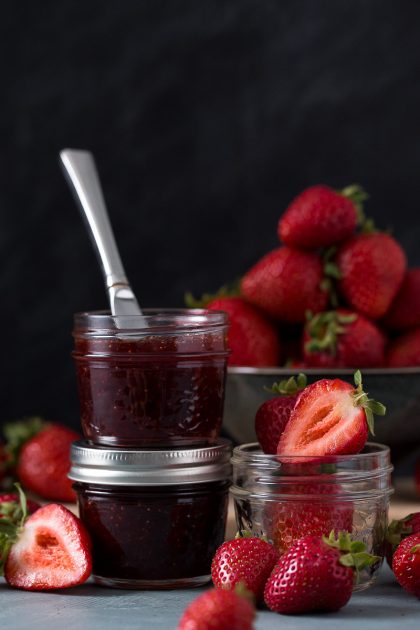
Continue ReadingWhat if I told you that you can easily make your own strawberry jam at home, without preservatives and added pectin? It’s true! Making strawberry jam is a super easy process and just requires a bit of time and patience. You will ask yourself why you didn’t try it sooner!
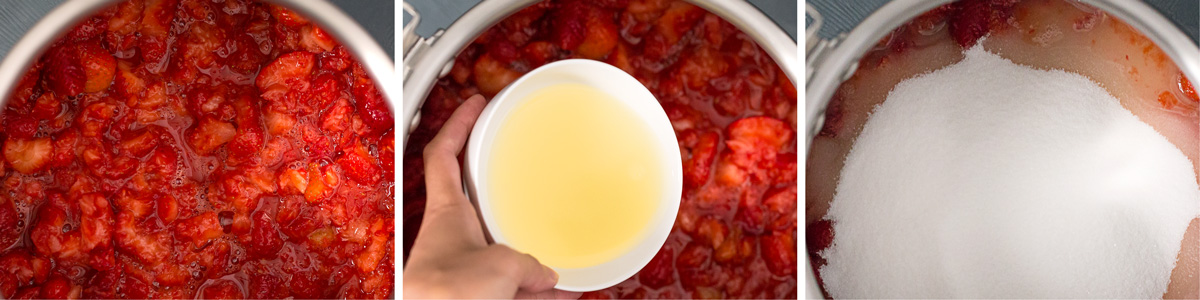
Fruit jams are essentially fruit, sugar, and some sort of acid component cooked together. This strawberry jam recipe is no different. You have your strawberries, your sugar and your lemon juice. These things are required to create the chemical reaction that results in the ‘jelling’ of a jam.

I took an easy approach to this recipe, being that I dumped all the ingredients in the pot, cooked them for 40 minutes and lo and behold—my jam was ready! Fresh, homemade jam that can be canned and distributed as tasty gifts, spread on crackers, toast or scones. This particular batch was made to be party favours at a Baby Shower.
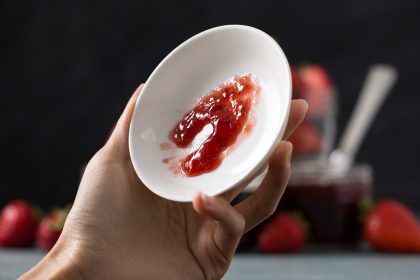
No two batches of homemade jam are the same—and that’s okay! That’s the beauty of being able to make your own jam which provides you the opportunity to control the thickness and sweetness. If I feel a particular batch of jam is too thick, I will add a bit of water, bring it back to a boil and test again. If I feel it is too runny, I will continue to heat and stir until it is cooked down to the consistency I like. There are other ways to fix jams to the desired consistency but these are the simple methods that I use.
Once you learn the fundamentals of jam making, you can create your own variations with little effort. Serious Eats has an excellent article discussing the basics of jam making which was an entertaining and informative read, I highly suggest you take a look!
Before weighing your strawberries, make sure they are hulled, otherwise the measurements will be off. A big thanks to Steven for hulling 4.5 pounds of strawberries for me. We had much fun picking out the ‘hero’ strawberries (aka the most photogenic strawberries of the bunch) for these photos. There were so many handsome berries in this batch, I was quite indecisive during the strawberry auditions!

Tools used:

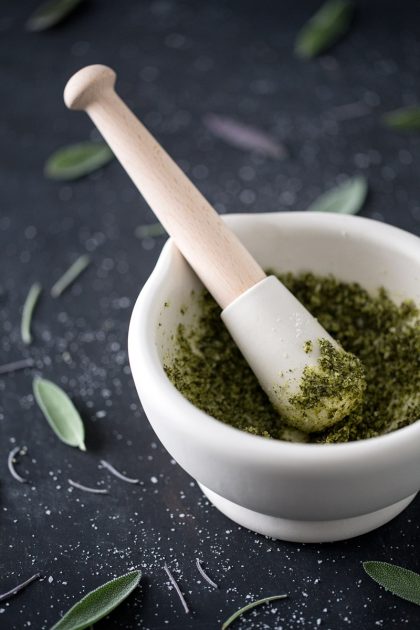
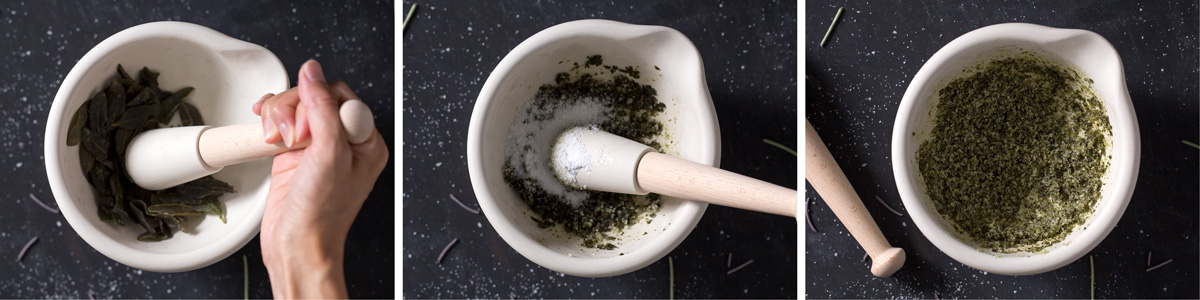
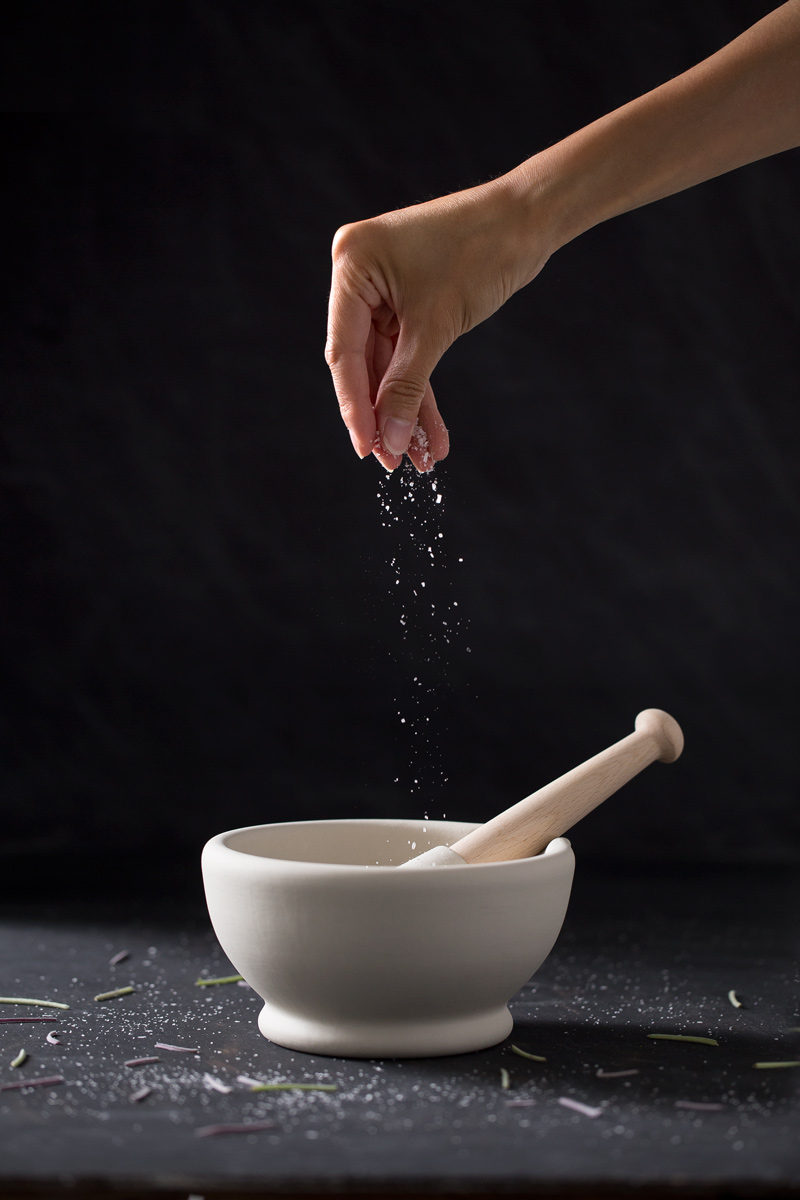
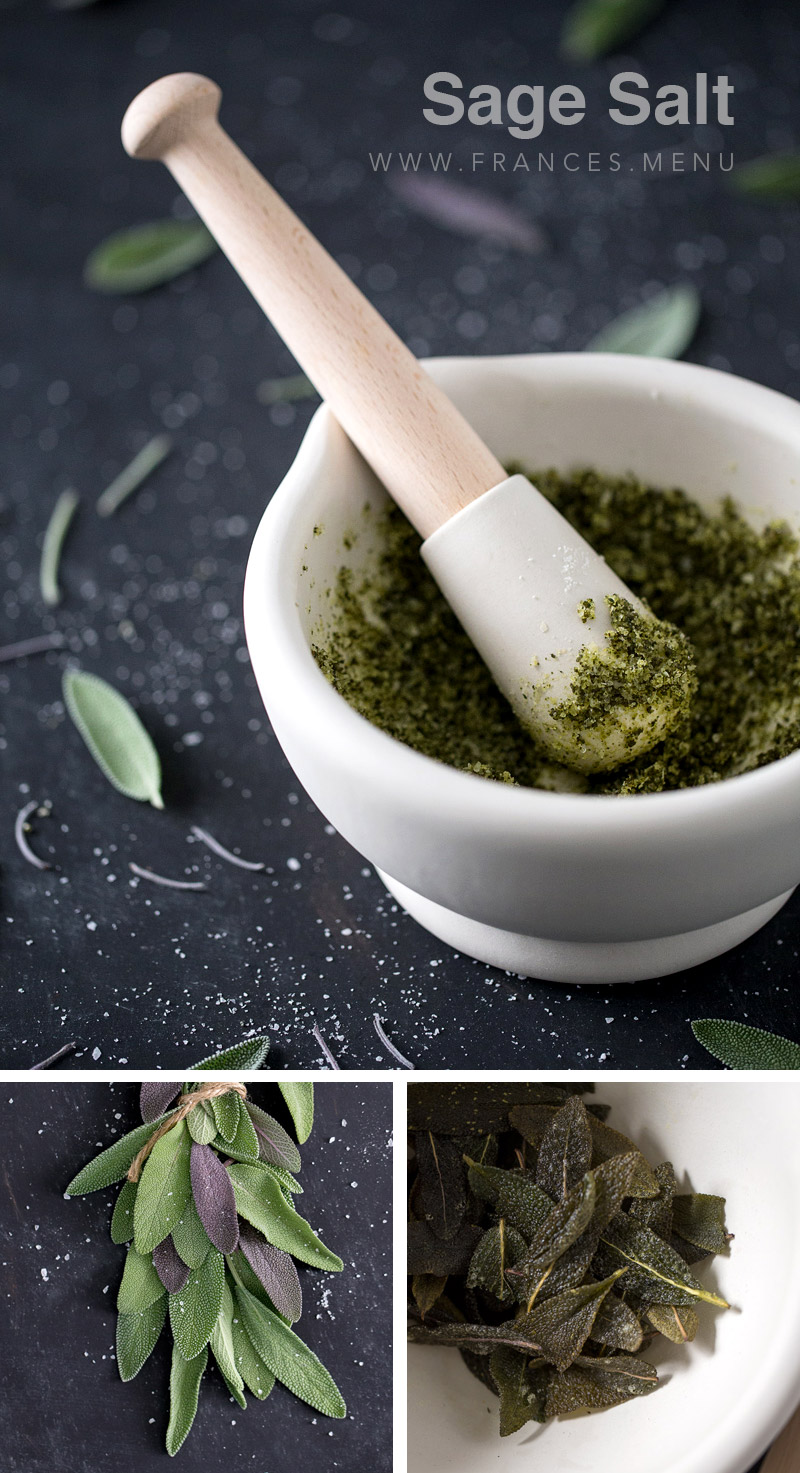
Sage salt is incredibly easy to make at home. Use this recipe to enhance the flavours of pork, chicken, fish and other meats. Flavoured salt is an excellent way to bring a different taste to your dishes and up your culinary game. It also makes an unique gift or party favour once packaged into small airtight jars.
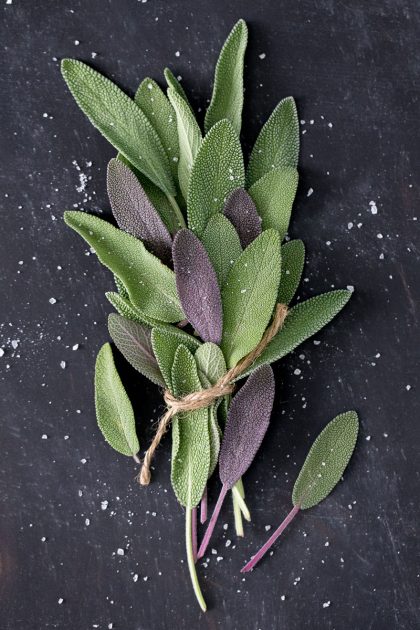
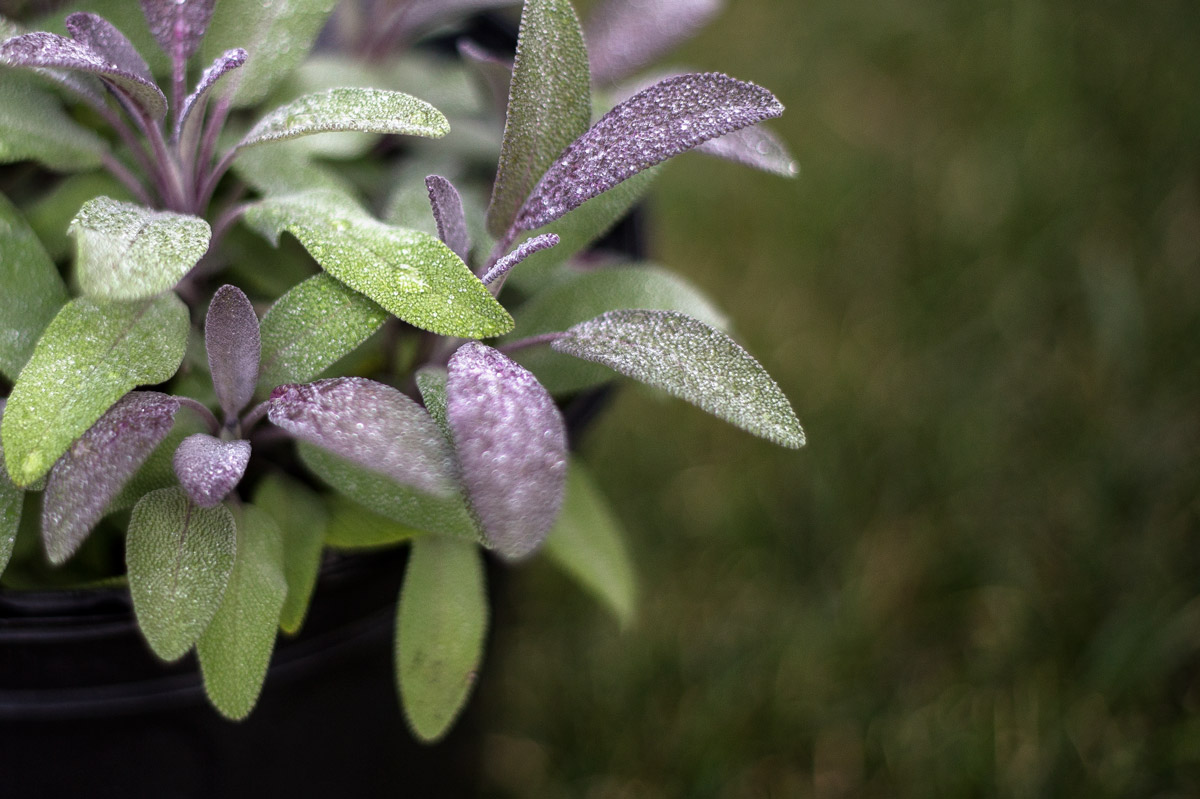
I start everyday with a brief stroll in my mini herb garden. I water the dill, check the scotch bonnet chillis, prune the oregano and generally bask in the sunlight. There is something satisfying about growing your own plants and even more so when you can eat the results. My sage plant makes me incredibly happy. It grows effortlessly and I love to run my fingers through its fuzzy little leaves and sniff that earthy aromatic smell. The scent also seems to deter bugs from nesting on it which is a plus, being that I’m not a big fan of those little critters.
Sage has many health benefits such as being anti-inflammatory and antioxidant compound. According to the world’s healthiest foods, “Increased intake of sage as a seasoning in food is recommended for persons with inflammatory conditions (like rheumatoid arthritis),as well as bronchial asthma, and atherosclerosis.” It has also been proven to help lower blood glucose and cholesterol (source).

A lot of flavour can be imparted with a very small sprinkle of sage salt so it’s important to use it sparingly so not to overpower the other tastes. The flavour of sage is known to pair well with pork and chicken, but don’t stop there! It can be used on fish, other meats, grilled pineapples and whatever you can think of.
As always, I’d love to see the results if you try this recipe! Show me your lovely creations by tagging @francesmenu on instagram, facebook, or twitter!
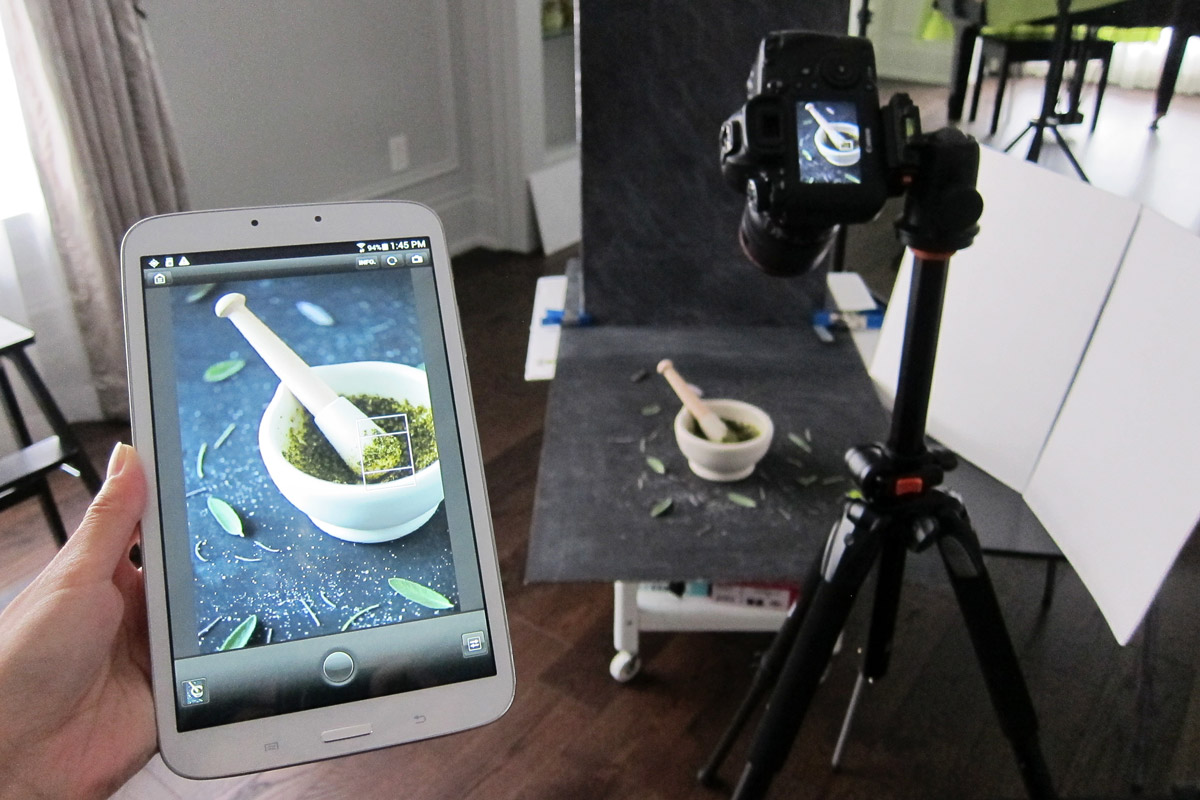
This somewhat takes the magic out of the way the food looks, but it is always fun to share how each of my recipes were setup and photographed. This time I took advantage of the natural light instead of using off camera lighting. In retrospect, I could have blocked off the light shining on the background to bring more emphasis to the mortar and pestle, which was the main subject of the photo, but I decided that I didn’t mind the lighting in the background and left it as is in photoshop.
It was my first time shooting a recipe with the 100mm Macro lens from Canon and I absolutely adore the flexibility it offers me to get right up in there and not worry about minimum focus distance. What a beautiful result! A big thanks to James who lent me this lens (and Kenny from before)! No wonder it is the ‘go to’ lens for food photography!
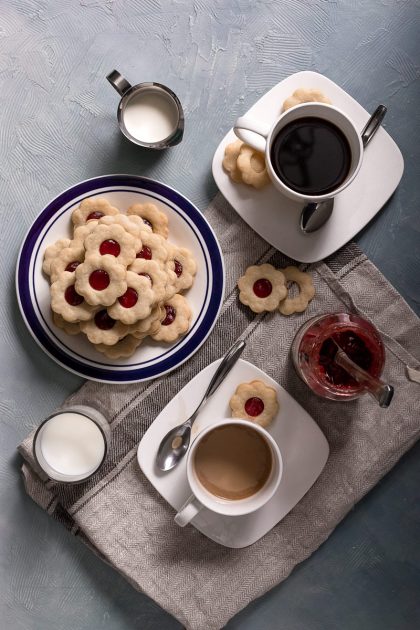
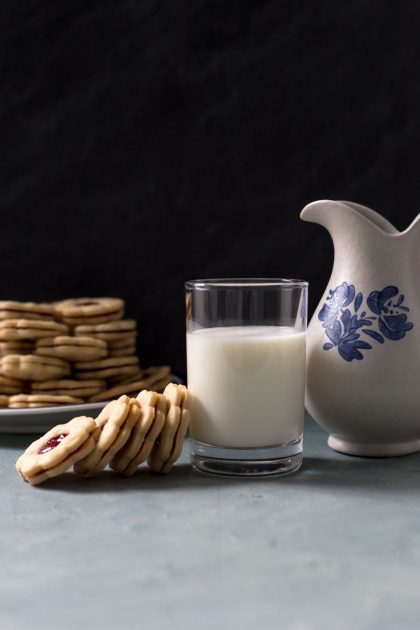
I’ve previously posted a ‘Classic Butter Cookie’ recipe on this site before and I’ll let you know right now that this ‘Versatile Butter Cookies (Jam Sandwiches)’ is quite different from that recipe in terms of method and ingredients. I have adapted this recipe from Cook’s Illustrated’s ‘Baking Illustrated’ Book. Many thanks for Cook’s Illustrated for featuring my photo of Jam Sandwich cookies on Instagram which they loved so much!
I like this recipe because it is meant to produce a versatile cookie that might pair with sweeter fillings/glazings and therefore the cookie itself is not as sweet. This is, if you recall from my other posts, perfect for me because too much refined sugar causes my TMJ issue to act up which does not make for a happy Frances. The texture of this cookie (as a standalone and not as a jam sandwich) is tender (not chewy) and compact with a fine even crumb and slight crisp.
I’m going to nerd out a bit here: I found the Cook’s Illustrated butter cookie version particularly interesting because instead of creaming the butter first and adding the dry ingredients afterwards (which is the usual method of making cookies), the butter is added to the dry ingredients (reversed).
Cook’s Illustrated reasons that because the butter cookie is meant to be a flat rather than fluffy and creaming butter produces a fluffy cookie and creates pockets of air. To be honest, I’m not completely sure about how effective this reasoning is, because I am still getting pockets of air in some my cookies, using their exact method (which, by the way, is not the method I have posted in my version of the recipe). Maybe I’m not mixing thoroughly, or I should be baking on a silicone baking sheet instead of baking parchment—if anyone knows, please tell me!
Despite this, I really don’t mind the texture and it suits my purposes—purpose being, slapping jam on them and eating them right away.
I’ve tried this recipe a good 3 times now and I quite like the results, as long as the dough is not overworked and given time to rest after mixing. Be aware that the more you work the dough, the more gluten bonds form which results in a stiff/tough cookie (not what we want). Chilling the dough is also important because it limits cookie spreading, concentrates the flavour of the cookie and allows for any gluten bonds to relax.
In my version of the recipe, I suggest that you roll out the dough before you pop it into the fridge to rest; it is more difficult to do this once it is cold. If you don’t have superfine sugar on hand, you can create some by pulsing it in the processor a few times, or if you’re lazy like me, just use regular granulated sugar (produces a cookie with larger crumb and a flakier texture).
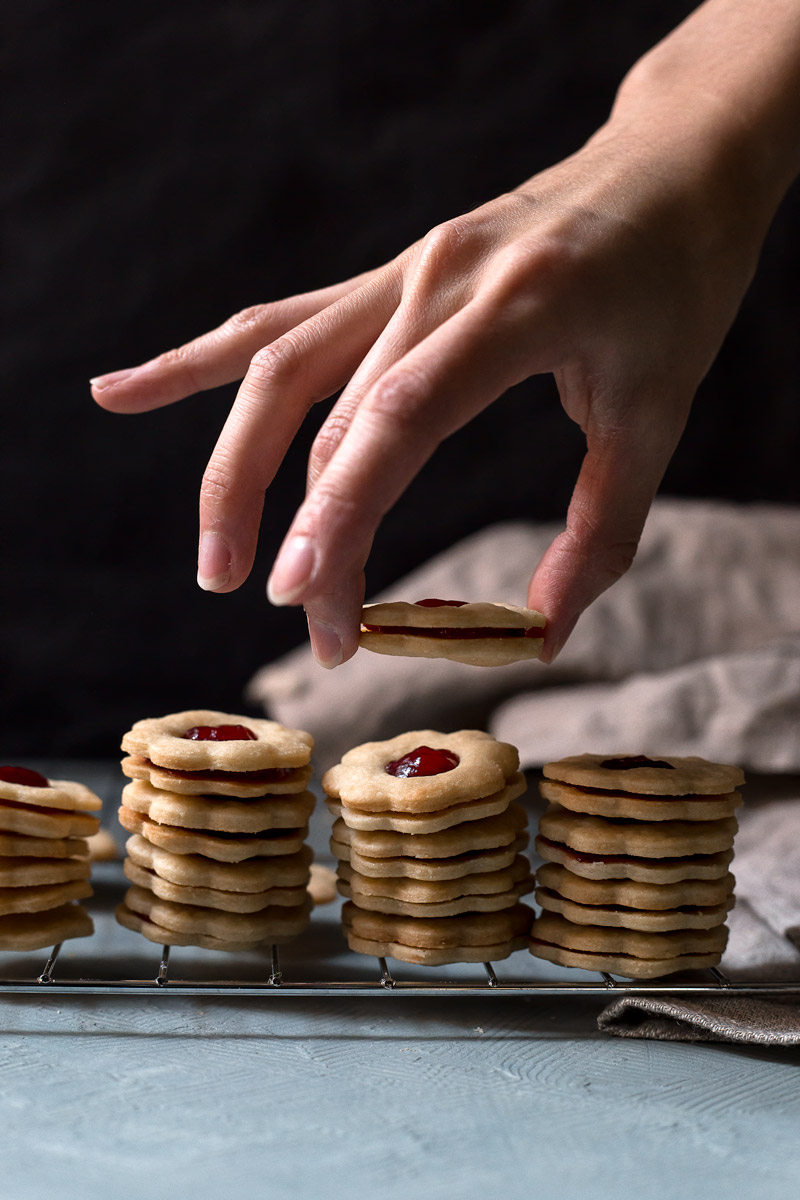
I encourage you to let your creativity run wild, and explore the different ways to use this versatile butter cookie beyond the ol’ Jam Sandwich. If you roll it out slightly thicker, you could also build a butter cookie house with it! Show me your lovely creations by tagging @francesmenu on instagram, facebook, or twitter!

Butter Cookie
Jam
Butter Cookie
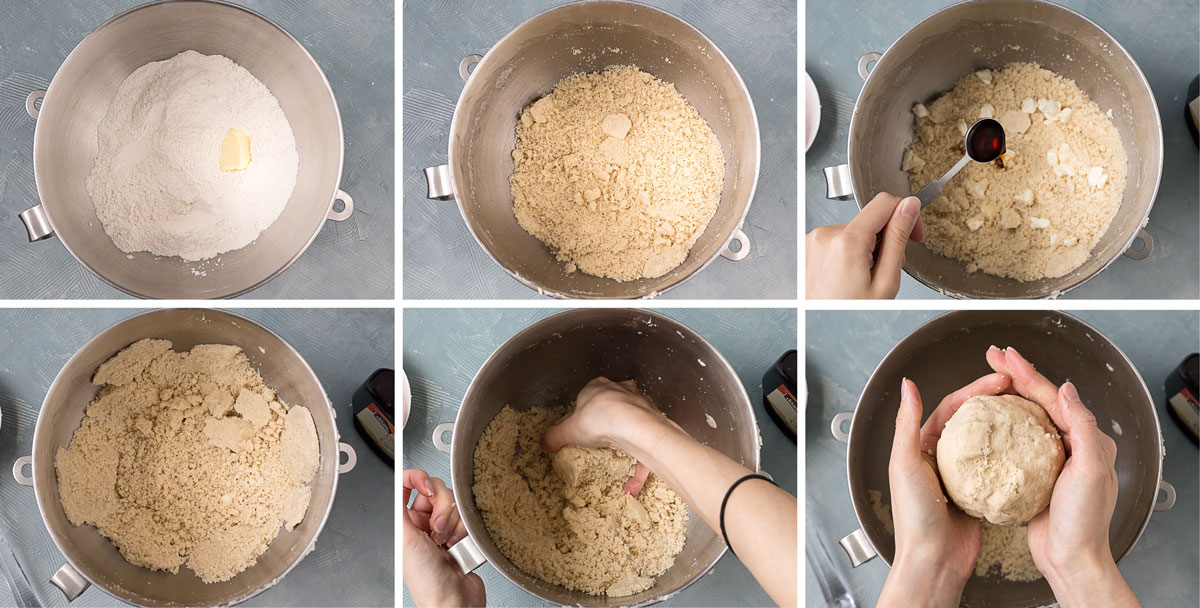
Pre-heat oven to 350 F. On low speed, mix flour, sugar, salt until combined using a mixer. Add the butter 1 piece at a time, continuing to mix until it begins to look crumbly and slightly wet. Add vanilla and cream cheese and mix on high speed for about 10 seconds, and back to low speed until slightly larger clumps are formed. It is very important that you mix until just incorporated and no more; mixing more than you need to will cause a cookie to turn out tough.
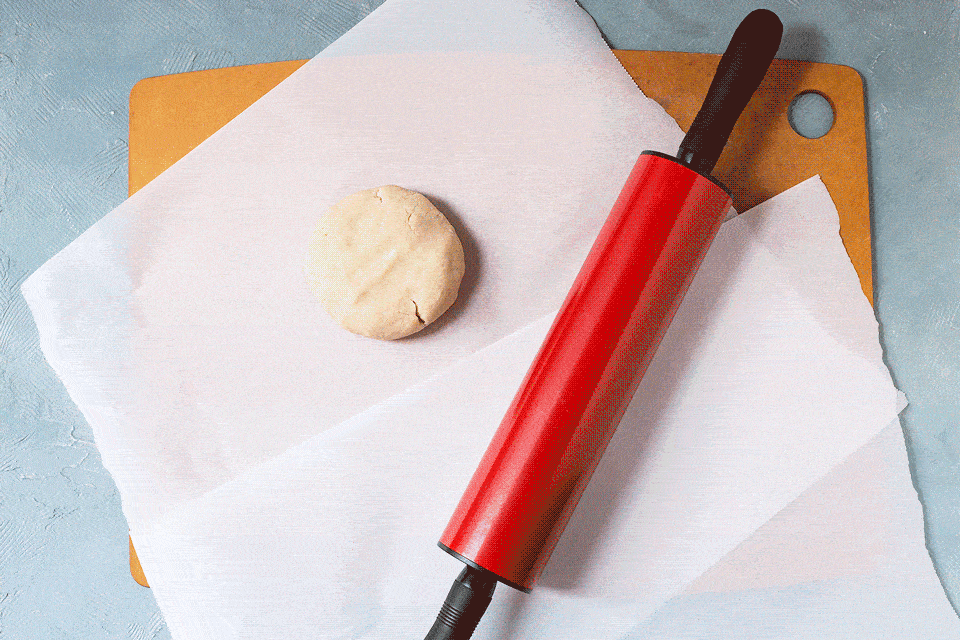
Using your hands, gather the crumbly bits of dough and form one large dough ball (this may take several tries due to the crumbliness). Divide dough into quarters and flatten into disks. Sandwich one disk between two pieces of wax/parchment paper. Roll it out to 1/8″ (3mm) thick, and let it rest it on a flat surface (e.g. cutting board) in the fridge for a minimum of 30 mins (preferably over 1 hour). Repeat with the other pieces of dough.
Remove the rolled out dough from the freezer and go crazy with your cookie cutters. Bake in middle rack for 5-7 minutes, rotating the pan 90 degrees every quarter of the bake time to ensure even baking. Supervise closely, it is better that they are undercooked than over cooked. If the edges of cookies turn into a golden hue, you’ve gone too far, although they are still edible, they will a be tougher texture.
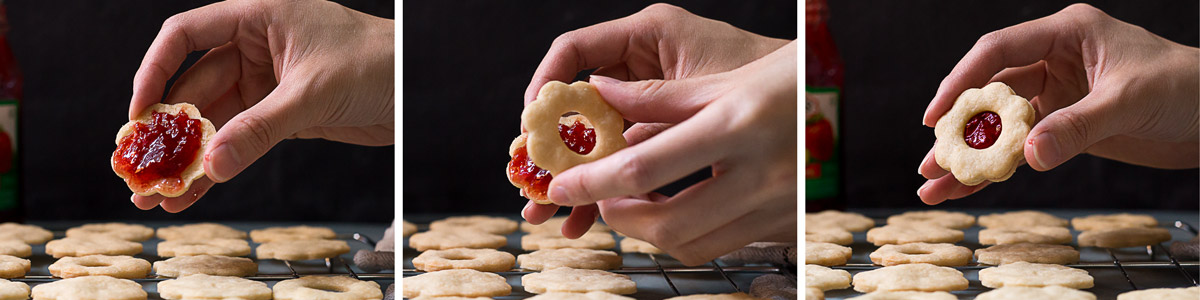
Jam Sandwiches
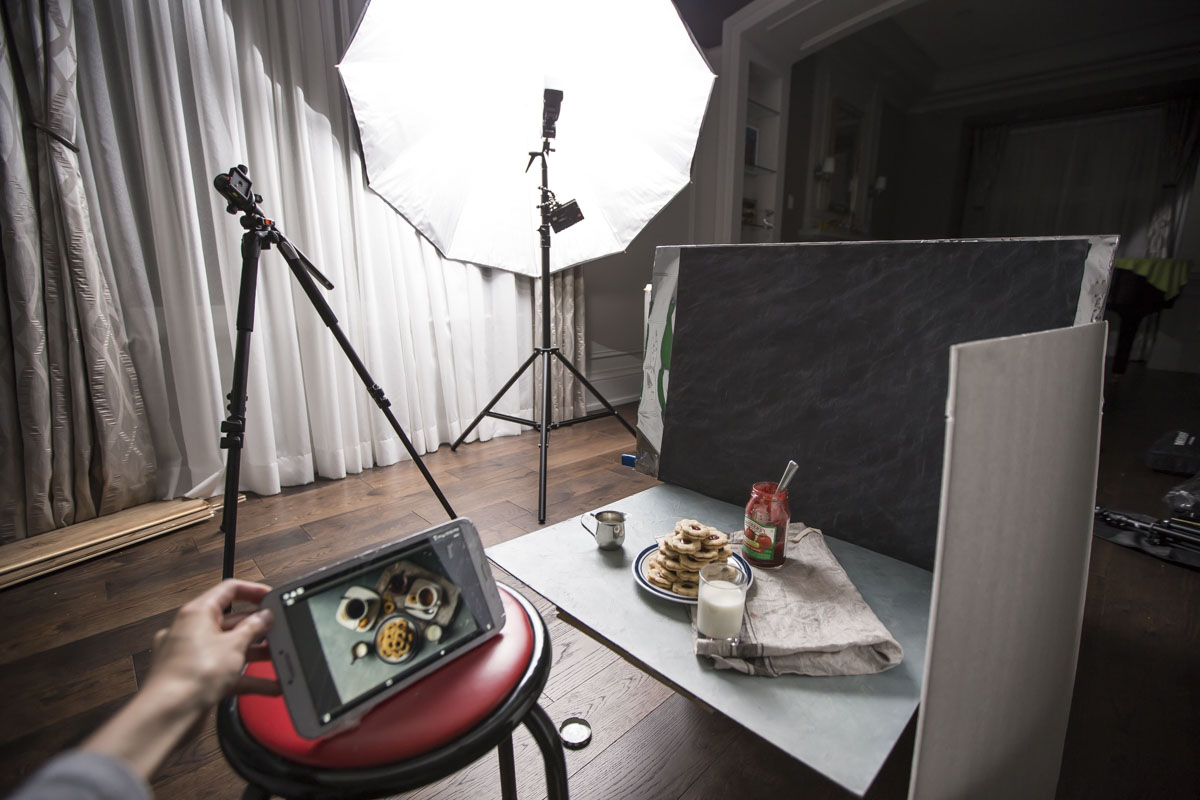
Using a 5′ umbrella to the back left of the staging area and white foam core board as reflector to fill in the shadows a bit as I didn’t want the lighting to be too dramatic/contrasted in the photo. Finally, I setup wifi tethering to my tablet so I can control the shot and see the images right away. This is especially helpful when when I have the camera at an angle that I cannot reach and I need to have both my hands in the photo. What I do is tap the shutter on the tablet, get my hands in the position as the timer counts down.